

When the Annular Solar Eclipse took place this June, it got me thinking about making a Sun and Moon scratch Art Lesson. The process of making scratch art takes a little time, but the results are always beautiful. Once you learn, how to prepare your own Sratch sheet, there are endless possibilities to what you can draw. Children ages 4 and upwards can easily do this art project.
Let's begin!
You will require ~
• a sheet of paper
• pencil for practising your Sun-Moon on another paper
• crayons, oil pastels
• black acrylic paint or black poster colours (optional)
• a scratching tool, if you don't have a wooden one, you can use a toothpick or an old ball point pen. Use your creativity and find a tool that serves the purpose, but is not sharp.
• a scratching tool, if you don't have a wooden one, you can use a toothpick or an old ball point pen. Use your creativity and find a tool that serves the purpose, but is not sharp.

1.Take your sheet of paper and fold it in half, next open it up, your paper wil now be divided in two parts.

2. On your left half make coloumns of red, orange and yellow, the fiery colours of the sun. Take your time, as you colour, leaving no white from the paper showing through.

3. On your second half of the paper, for the Moon, colour with blue, green and purple. As before, taking care, not to let any whites show. When finished, the paper will be rainbow hued.
 |
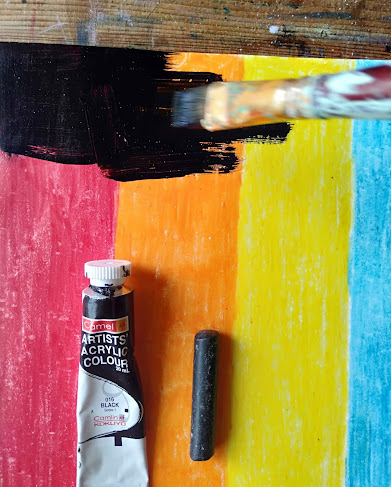
4. Next, we have to cover the entire paper in black. If you are using crayons, make sure all of the colours underneath are covered in black evenly. If you choose to use either acrylic or poster colours, you can apply it in two coats. In case you find the paint isn't adhering too well, mix in just a bit of dishwashing liquid. Younger children will need help from a grown-up, to set up the paint, water and brushes.

 |
| Mine looked like this and needed another coat of paint. You can do the same if you find your paper needs more coverage. |
 |
5. After applying a second layer of paint, allow it to dry completely. Meanwhile, take a pen or pencil and practise drawing your Sun-Moon on another paper. This is the sketch I made.
|
 |
| 6.Now comes the fun part. Using a round object like a lid or small saucer, trace a circle in the centre of with your scratching tool. With the help of the drawing you made earlier begin etching out the faces of the Sun-Moon inside the circle. Etch in pointy triangular rays for the Sun and curly ones for the Moon. I also added swirls and diamonds. If you wish to correct something, simply take a black crayon and cover that part up, and scratch again. |

 |
 |
Tada! and we're done. Take a look below, at the art-works by children, done remotely from their homes. Some are by my art students and some are from my daughter's class in school. They are all between the ages of
4 -7 yrs. Their parents kindly sent me these photos.

Aren't they all beautiful? Do try this Sun-Moon Scratch Art and Please share on Instagram with #brushesandcrayons. Stay safe, be well and see you in another post ☺️
~ Sabrina